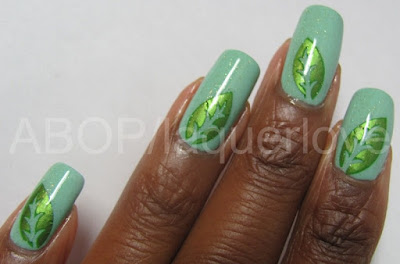
APPLICATION: Annoying! Thick and slightly streaky. 2nd coat was better, but not much. Worth it for the color though!
COATS: 2
TOPCOAT?: See photo comments
SOURCE: Icing store in the mall - part of a five-pack of minis. Decals were purchased at Joann fabric & crafts store.
COMMENTS: This color is unique to my collection - yaay! It's gorgeous and shiny and was the perfect base for another go at using rub-on decals. I've been wanting to use more of these since my first mani with rub-ons. These wrinkled a bit, but I'm very happy with the final result!
Base coat + two coats of the green - so shiny on its own:
After cleanup and one coat of Beauty Secrets Fast Finish:
The rub-ons I used. I've placed my fingers right next to the section with the leaves used:
Right after applying the rub-on decals:
Finally, applied a coat of China Glaze - Golden Enchantment for sparkle, and covered with another layer of my fast dry topcoat:
UP NEXT: Either the darker blue or the coral from the same pack:


O_O this looks pretty nice! I love the idea and the colors!
ReplyDeleteVery pretty!!! I like the leaves!
ReplyDeleteThis pretty mani makes me think of fairies, lol
ReplyDeletethis is gorgeous! I wish the rub ons were nail stamps because I would love to duplicate it on my nails
ReplyDeletei love it!
ReplyDeletetha't pretty
ReplyDeleteVery pretty! Decals are a nice touch. I thought they were stamps. :O)
ReplyDeleteI would love to see how you applied the rub ons...was it just like you would do on a piece of wood or something?
ReplyDeleteThanks for the comments!
ReplyDelete@Catherine: I cut out each leaf individually (easier for me) and place the piece on the nail. Then I use my finger to apply pressure and rub over its surface until it releases from the backing and is adhered to my nail.
Your nails are gorgeous, and I love the decals!
ReplyDeleteGreat job!
ReplyDeleteI like this mix!
I love, so pretty !!
ReplyDeleteExcellent color match....I wish I had an eye to match similar colors, but alas, I don't. I have a pack of rub on stickers and I'm hesitant to try them...any tricks or helpful tips?
ReplyDelete@Lacquer Ware: To be honest, I didn't know if it would match or not! I just sat it on my nail first to make sure it wouldn't be an eyesore, decided it was okay, and then rubbed it on.
ReplyDeleteTips - hmm, it's not that difficult, but maybe:
1. Try rubbing small bits on a piece of paper or false tip to figure out how much pressure you'll need to use. Even better, try it on your bare nail!
2. Make sure your base polish is dry before you start as you will be applying pressure to it. I use a quick dry topcoat and wait for it to harden before using the rub-ons.
3. I use my finger(s) to rub instead of the popsicle stick that usually comes with the rub-ons because of the curve of my nails (and it's easier).
4. It's easiest to cut up the individual portions that you will use for each nail. I use tweezers to bring it to my nail and position it, then put down the tweezers and rub it on.
Just try it - the good thing is it's not messy since you don't need water or nail polish! Hope this helps...
hello girl
ReplyDeletesorry for the delay, happy new year
and my view it's that wonderful nail-art
great, really great !!
I started reading your blog very recently, but I´m already a great fan of your creativity. Loved this green art. Congrats from Brazil,
ReplyDeleteSuch a fun mani!
ReplyDeleteWhat a sweet colour! :)
ReplyDeleteI tagged you in a Stylish Blogger Award cause I like your style!
http://perdyclaws.blogspot.com/2011/01/stylish-blogger-award.html
I love those leaves, really amazing!!
ReplyDeletewish I had an Icing store, those are nice colors!
Wow VERY pretty!! I'm thinking about how I can recreate the leaves myself, hmm...
ReplyDeleteWhat a gorgeous mani!!! Love those decals...awesome girl!!! :D
ReplyDeleteThis is a great mani! You are so creative :)
ReplyDelete