Saturday, July 16, 2011

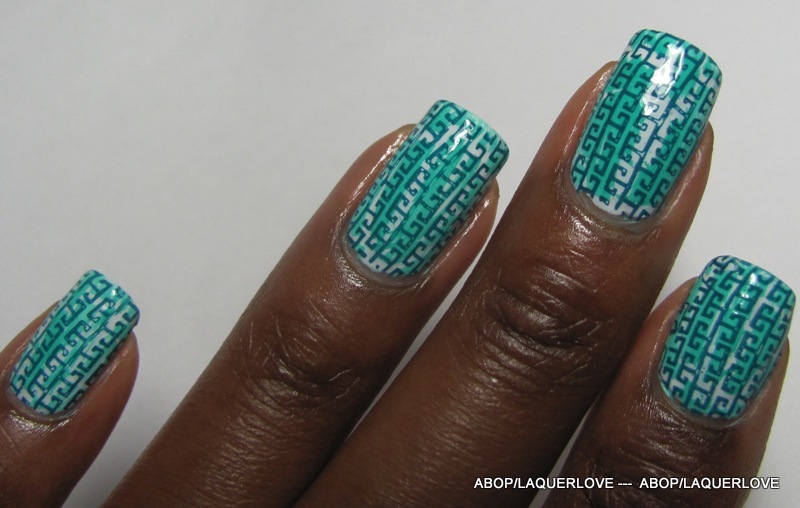
Making crackle polish work for me


COATS: 2 of the base white, Kleancolor White
TOPCOAT?: Oh yes!
SOURCE:
COMMENTS:  A few of you know I really haven't been feeling the crackle trend as I simply don't find it attractive - even after buying a few crackle polishes to see if it looked better in person. Well, the other day I wondered what it would look like as background texture for stamping, just like one would use sponged on colors as background. I made sure to use a stamping color that would take my attention away from the crackles, and it worked - and I like it! Now my two Mia Secret crackle polishes have been removed from the blog sale, lol!

What do you think? Do you see crackle or just a textured background?


Colors used: Kleancolor - White, Mia Secret - Pastel blue (it's really not blue though), American Apparel - Peacock
Stamping pattern from Magnonails XL plate B


Friday, July 15, 2011

Stamping with Diamond Cosmetics - Tranquility

COMMENTS:  This post is for Paillete, who wondered in this post on her blog (Paillette: a little nail polish journal) what this color would look like stamped over certain colors. Well here you go my dear!

I used no base coat in these photos, and one coat of topcoat. Ignore the messy cleanup and dryness - I swatched outside so didn't bother washing and lotioning between swatches like I usually do.
All photos are clickable to enlarge.

Diamond Cosmetics - Tranquility over:
Revlon - Powder Puff, 3 coats


Nina Ultra Pro - Never Glum Plum


Nyx Girls -  Fierce Purple


Thumb to pinky -
1. Diamond Cosmetics - Cool & Creamy
2. Essie - Marshmallow
3. NYC - Park Ave
4. Diamond Cosmetics - Under the Willow Tree
5. Simple Pleasures - unnamed dusty periwinkle blue


I ended up leaving this on and wearing it to church the next day, lol! 

And a sneak peek at some right hand "play" that I ended up duplicating for my next mani:

Tuesday, July 12, 2011

Play - what I do best!

COMMENTS: More results of my playing with polish...

Thumb to pinky: 1) FingerPaints - Don't Make a Scene with temporary tattoo, 2)two frankens stamped with a third brown franken,  3)  LA Colors - nameless red jelly from a pack with Kleancolor - Firework glitter, 4) Cherimoya - Jazz Olive with Kleancolor - Neon Sapphire stamped over it, 5) Nabi - Baby Green with white stripes and glitter franken. 

The poor temporary tattoo has so many bubbles because I was impatient, lol!


Messed with it again - another coat of the red jelly over the glitter (it changed the color of the glitter - no longer gold and teal!), another layer of stamping on the ring finger.

Swatching my latest flakie franken over LA Colors - Amethyst. 2 coats - so pretty!

Monday, July 11, 2011

Nabi - Light Green, Baby Green and Green Glitter

APPLICATION: Smooth on all
COATS: 2 of the base, Light Green
TOPCOAT?: Yes
SOURCE: Nail supply store in downtown Los Angeles
COMMENTS: I'd been eying this green for a while and after applying it, decided to add the dots and some glitter. I didn't intentionally end up using all Nabi products - this just happens sometimes! This was an okay mani, nothing spectacular.


Sunday, July 10, 2011

Fingerpaints water marble

APPLICATION: Smooth
COATS: 2 of the white base
TOPCOAT?: Yes
SOURCE: All from Sally Beauty supply - the only source for Finger Paints polish.
COMMENTS: I started this with my favorite white - Paper Maiche. I then marbled Paper Maiche, Amethyst Atelier (blue) and Primary Color (red). My marbles always end up being so random, so I was disappointed at first, but it didn't look too bad!
The pattern on my left thumb was an attempt to get the "bull's eye". It didn't come out clean, so I added dots. I also added the dots on my right thumb (which has finally grown out the vertical split it had, yaaaaay!)


Left Hand:


Right Hand:


Saturday, July 9, 2011

H & M - Brown and Nabi - Mocha

APPLICATION: Smooth, nice thick formula on both
COATS: 2 of each
TOPCOAT?: Yes
SOURCE: H&M mini purchased in a set of 4 in NYC, Nabi from downtown LA nail supply store.
COMMENTS: This H&M mini is the only reason I purchased the set when I was in NYC back in May. I saw this color and just had to have it. The other colors in the set are white, beige and a blue. I had these two colors standing next to each other and just had to combine them in a mani. They reminded me of retro color combos, so I stamped with American Apparel - Mac Arthur Park in an attempt to make a 70-s style design. It ended up looking more like fabric though. Doesn't matter, it's all good!


Outdoors the next day:


Friday, July 8, 2011

Frankens of frankens...

COMMENTS:  After making my Strawberry Save franken, I realized I had already frankened something in a similar color.  However, I still had the franken bug, so used Strawberry Save to make two more frankens. Yes, I franken my frankens!


A. Strawberry Save
A1. Strawberry Save - frankened some more with green
A2. Strawberry Save - frankened with more of the source Orly colors
B. Previous franken (Entertaining Show) -  frankened some more with blue


I  like this one (below) so much more than its starter franken!
It went from this:

To this:


And this is how my bottles of nail polish just keep on multiplying! At least these are minis, right? Heehee!